In this article we will see how to disassemble Pogoplug V4 and attach serial cable to the serial pads on the board.
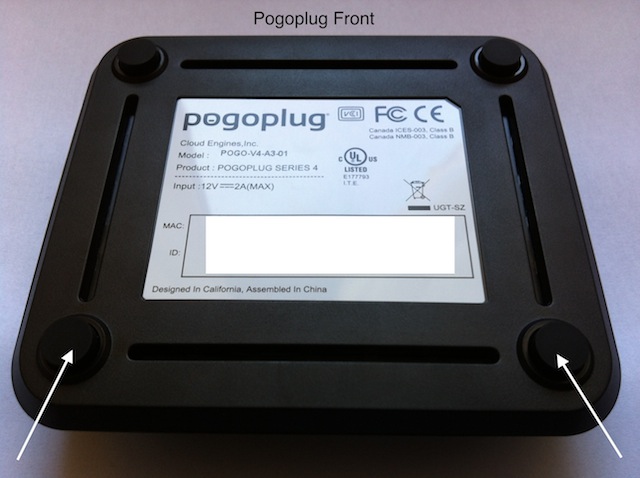
To begin disassembly we need to remove the two rubber pads on the bottom towards the rear edge. (see white arrows in the image below.) The rubber pads are glued and can be easily removed and replaced.
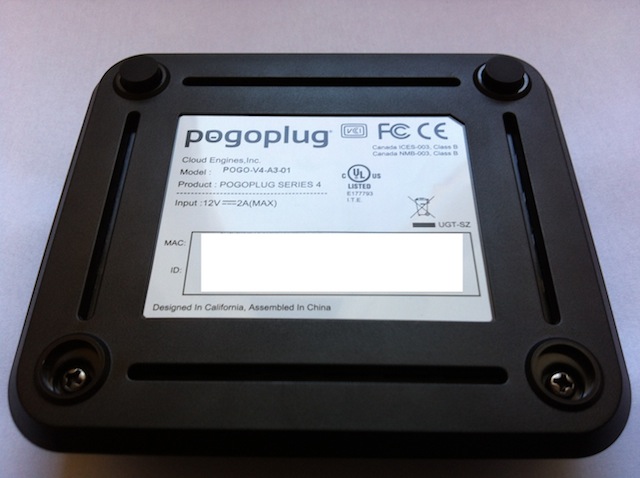
After removing the two rubber pads we can see the two screws as in the image below.
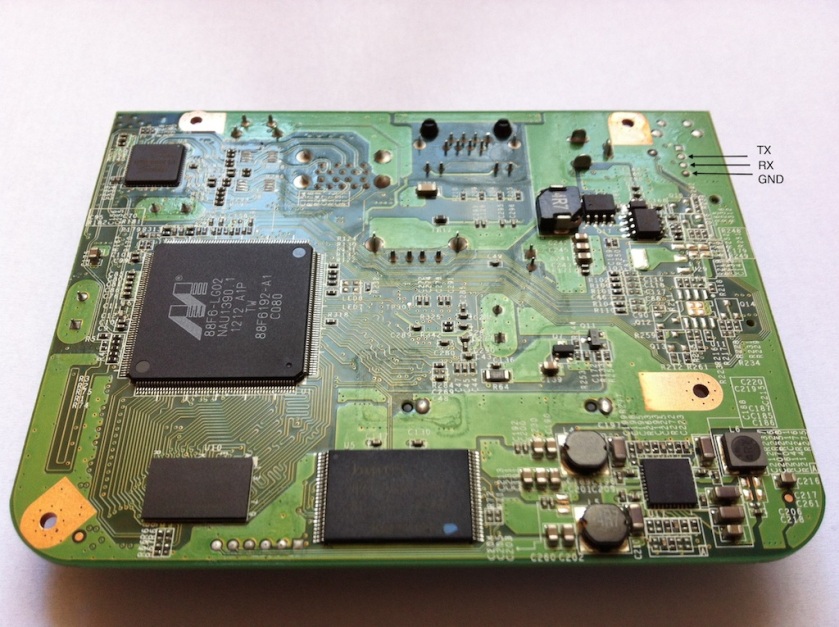
After removing the screws, we can remove the top cover of Pogoplug and see the main board as in the image below. We just need to be careful about the soft locks (white arrows in the image below) in the front and sides of the Pogoplug.
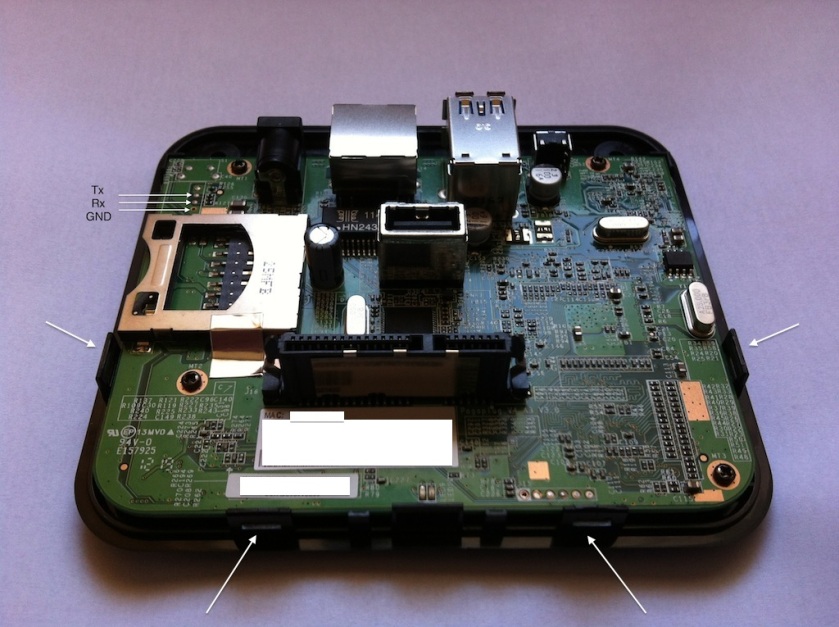
The pads of the serial connection are shown in the image above:
- GND: Ground Terminal
- Rx: Serial Receive (data into Pogoplug)
- Tx: Serial Transmit (data from Pogoplug)
I used Nokia CA-42 serial cable and identified its terminals as shown in the link below:
Use a Nokia Serial Cable on an ARM9 Linkstation
Now you can solder your serial cable the way you wish. Continue reading if you are interested to know the way I used myself.
I’ve tried to connect the serial cable and get it from the bottom of the Pogoplug to be able to assemble it again. I ended up with the setup shown below:
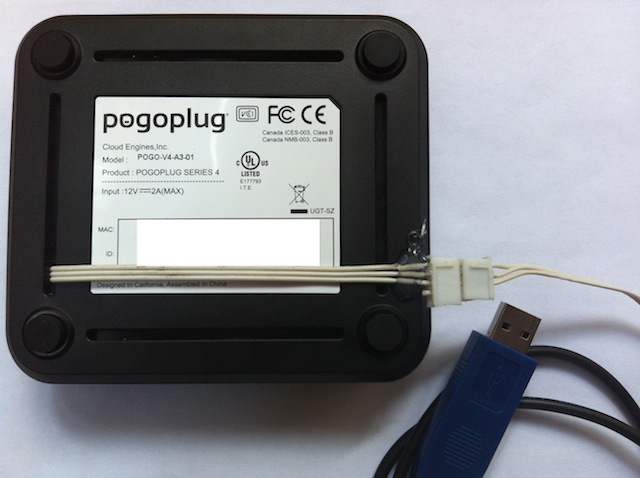
I’ve cut the CA-42 cable and attached a connector as shown below. So that I can plug it into this Pogoplug, or use it in another project without re-soldering.

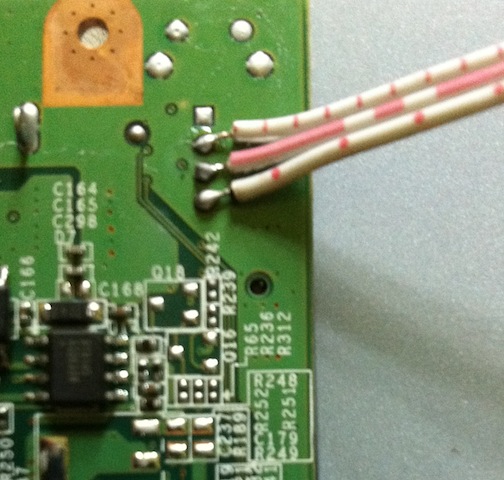
To solder the serial connector to the Pogoplug board, I had to solder it on the bottom side, so that I can extract the wires from the bottom cover of the Pogoplug as shown earlier. The image below shows the bottom side of the board and highlights and serial pads we need to solder. We need to remove the four small screws that fix the board before we can remove it to solder on the bottom side.
The image below shows the 3-terminal wire soldered into the board.
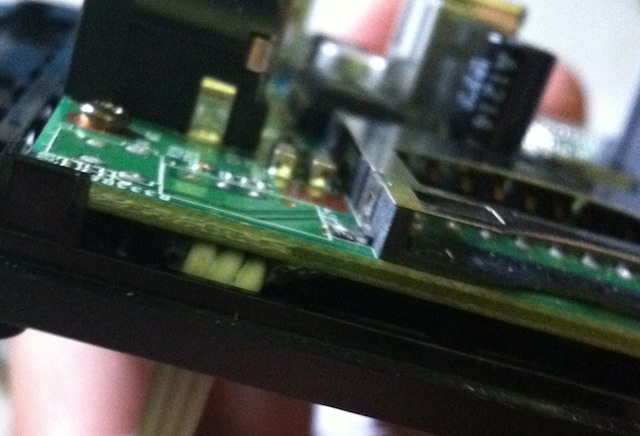
We better use a glue gun to fix the wires into the board to avoid breaking the solder while we extract the wires from the opening on the bottom side of the Pogoplug case. After we extract the wires and fix the board in place, we get something as shown in the image below.
Now we can assemble the Pogoplug again, and connect the serial cable using the external connector as below.


Today I purchased a Pogo plug V4 (V4_A1_V3.1)
No SATA port or second USB port 😦
LikeLike
I understand that there are 2 versions of pogoplug 4, one of them has sata port.
http://pogoplug.com/devices#pick
LikeLike
the pogoplug mobile DOES have a sata port!! it needs to be soldered in!!
LikeLike
Thanks for sharing this info.
LikeLike
Not sure if the SATA port will work in the mobile.
There are no voltages showing at the sata ports and the mobile has quite a few components missing compared to the V4 board. Thanks to Moustafa for his photos of the V4 board.
LikeLike
I just opened my pogoplug mobile and althought it looks one can solder in the sata port, it won’t be of any use. However, there might be enough space to stick (maybe with doublesided tape) a 2.5 sata to the top case, internally, if one removes the internal vent on the top. I’m considering doing this using a sata to usb adapter, the thing is how to do this without losing the only usb port available…
LikeLike
Hi Moustafa,
Thanks for the great post. I got a pogoplug v4 device and tried installing arch linux onto it using the instructions here. http://archlinuxarm.org/platforms/armv5/pogoplug-series-4
The ppv4-install.sh script ran successfully. But when I power cycled the device the green light just kept blinking. The device does not even send out a DNS query. Obviously there is no ssh either. Most posts on the arch linux form seem to suggest a serial connection to debug this.
I found your post to be the most detailed with instructions. I’m wondering where you purchased the connectors and such.
Also, once you wired up the serial connection was up did you use putty or some kinda terminal emulator to make the serial connection?
Sorry about the many questions. I got a excited about installing arch linux on my brand new pogo and might have bricked it. I dont feel too good about it. Any help you can give me would be great.
-A
LikeLike
wish you best of luck with your new pogoplug.
I got the serial cable (Nokia CA-42) from amazon.
I used putty on windows, and CoolTerm on MAC.
LikeLike
Great post. I would try to debug my bricked Pogo v4.
By the way, is the Vcc 3.3V not necessary to connect? I’m wondering why you just soldered three wires. Does it work? Please help me.
LikeLike
Thanks for your feedback. Yes 3 wires are all that needed for serial connection. It worked with me this way 🙂
LikeLike
Hi Moustafa,
great job! With serial cable what possibilities would you have? Accessing u-boot or also a prompt to login if installed os still runs? I unfortunately stopped the cloud service not beeing aware ssh will not work afterwards… so I search for a way to
access /etc/init.d/rcS and activate it again.
LikeLike
Hi Markus, thanks for your feedback. With serial cable you would have root access to the OS (as if you logged in with ash using root user). So yes you cab edit any file.
LikeLike
I soldered in the cable and am using Prolific usb to serial cable for windows. Using putty with speed of 115200, 8, 1, none, none on com port 8 which is what control pannel devices shows under port for the Prolific. I push reset and then open putty in serial mode but it times out. have checked wiring and all is well. Maybe I have wrong config or missed a step. Any ideas? Have series 4 with one usb and no sata. Thank you.
LikeLike
I would say double check serial connection terminals (serial port Tx connected to Pogo Rx and vise versa). Also I usually open putty first then reset.
LikeLike
Dear Mr. Moustafa
Thanks For This Grate Post ,,
Kindly I Need Your Advice & Help
I Tried To Install Arch Linux As Of :
http://archlinuxarm.org/platforms/armv5/pogoplug-series-4
But I Fail
My Pogoplug Now Is Dead , ( Auto Re-Boot)
1- I Need Correct Link For Software File
2- What The Program I Should Use To Write The Software File To The Device ?
( If Its Putty .. How To Use )
Sorry For My Many Questions
Waiting For You Reply ..
LikeLike
Thanks for your feedback.
before trying any fixes I advise the following:
1- remove any USB drives from the plug and try rebooting. and see if it at least boots to the original firmware.
2- post to the http://archlinuxarm.org/forum/ as there are many supportive people knowledgable about the archlinux installation.
As for your questions:
I assume that software file here means the plug boot firmware (uboot). Please let me know if you mean something else.
1- the link of the uboot from the ArchLinux installation script is: http://archlinuxarm.org/os/ppv4/uboot.bin.gz
2- to load new version of uboot into the plug without access to the linux command line. here is what I know:
a- connect to the plug with serial connection
b- configure TFTP server to hold the new uboot file (your PC can act as TFTP server)
c- issue uboot commands to load the file and write at the correct address of nand
the above steps are NOT TRIVIAL. and I’ve not went through them end to end. I’ve tried the loading, and didn’t try the writing. So as advised above, please post into the archlinux forum to get support from several knowledgable people.
let me know if I can support any further.
LikeLike
hello,
sorry my english
I have the same problem
Tried the “1- remove any USB drives from the plug and try rebooting. and see if it at least boots to the original firmware.” and not got the original firmware.
I tried the format this flash drive as ext3, label it “rootfs”. and not 😦
how is connect to the plug with serial connection? cabo RJ45?
LikeLike
Does it mean the pogoplug is not starting original firmware, or archlinux? Does the font lights turn on? Which version of pogoplug?
LikeLike
I think not starting firmware.
It blinks green for a while, then blinks red while it accesses the flash drive, then restarts.
pogoplug v4
LikeLike
If it blinks green, then it starts the original firmware. Red blinking means it cant access internet. Please make sure the plug is connected firmly to your router, and that it connects to internet. Then you should be able to see it on the my.pogoplug.com
LikeLike
Next to the Ethernet port it has the 2 lights on.
Como é que vejo de connects to internet?
Ele nao ligar bay ssh?
LikeLike
If the router is connected to internet and other devices can access internet, then pogo plug should be connected to internet as well. Have you made any modifications to the original firmware (.e.g modified any files)? Has it worked with you before you try installing ArchLinux?
LikeLike
yes follow this link.
http://blog.qnology.com/2014/07/hacking-pogoplug-v4-series-4-and-mobile.html
stay with these partitions “/media/ubuntu/rootfs” and not /media/rootfs.
how can I format to stay /media/rootfs?
LikeLike
I’m not familiar with the details of such modification method. I suggest to try posting to their blog for further assistance. If you end up having to attach a serial cable, you can follow my article. And please let me know how I may help any further.
LikeLike
thank you.
you know tell me if this cable also gives.
http://www.ebay.com/itm/400524483249?_trksid=p2045573.m570.l4467&_trkparms=gh1g%3DI400524483249.N19.S2.M-4419.R2.TR3
thank you
LikeLike
I think any 3.3v TTL serial interface should be fine. So the product given should be fine.
LikeLike
thank you
LikeLike
I guess you’ve become the PogoPlug V4 “de facto” savior.
Like many others in the comments, I was playing with my Pogoplug and it ended up being bricked.
Now, after seeing your pictures, soldering the cables to the mainboard doesn’t seem too difficult, but once that’s done, what’s next?
What is the USB connection for?
Having the cables soldered is enough to bring my pogoplug back to life??
Thanks Mr. Savior
LikeLike
Thanks for your feedback.
Well it depends on how the plug is bricked. Once we have serial connection with the plug, we can almost do anything. E.g. Access the Linux installation and make any modifications, write new uboot image, change uboot environment, and so on.
So how your plug is bricked?
LikeLike
Hi.
The light in the front won’t blink. Neither green nor red, but the ones in the Ethernet port, start blinking as soon as I connect an Ethernet cable.
Is this info enough?
Thanks!
LikeLike
Thanks for that info. Please let me know what you were doing when it got bricked. I’m trying to figure out the reason of bricking.
LikeLike
I was following the steps from: http://blog.qnology.com/2014/07/hacking-pogoplug-v4-series-4-and-mobile.html
and after typing:
/tmp/flash_erase /dev/mtd0 0 4
/tmp/nandwrite /dev/mtd0 /tmp/uboot.2014.07-tld-1.pogo_v4.mtd0.kwb
The result was something like: file not found (I can’t remember exactly but I couldn’t go any further)
LikeLike
Thanks for this info. It looks to me that uboot on mtd0 has been erased, and new one was not written (command failed as you outlined). So in such case, I believe serial connection won’t be enough. I understand that you will also need JTAG connection to flash new uboot. I advise posting a thread in forum.doozan.com. They are experts in such stuff and may recommend simpler solution. But anyway you will need the serial connection to interact with uboot after flashing it.
LikeLike
Any thoughts on the pin-out to a standard 9 pin DIN connection? I’d like to wire this up to a run of the mill 9 pin serial adapter that I can use with the USB to serial adapter I carry around in my bag for accessing console ports of Cisco and other Network Gear. Thanks in advance.
LikeLike
Hi,
I bricked my Pogoplug mobile version while trying to install linux.
I have ordered for the USB Serial cable and going to solder the wires.
I see many instructions to recover the original firmware and getting confused.
Can someone post the most recent one, pls.
Regards
Manish
LikeLike
I just ordered a USB to 3.3v Serial adapter to try and install Arch Linux Arm on my PogoPlug Mobile V4.
Question though, can the SD card be used in place of the USB flash drive for the Arch installation? I would like to leave the USB port free for an external HD. Also, is that a second USB port pointing up in the middle of the board? If so, is it active and usable? I have no problem cutting a hole in the top plastic to make that accessible later 🙂
Thanks for any info/help!
-Jeff
LikeLike
Good luck with your ArchLinux installation 🙂 Actually the bootable devices depends on the version of the uboot installed on the pogoplug. the default one only boots from the local flash, and the one you update as part of the archlinux installation (from archlinuxarm.org) only supports booting from Sata or the USB2 slot. So I’m not aware of any uboot version for pogoplug4 that supports booting from the SD card or even the USB3.
LikeLike
Actually totally successful using the above directions to install the uboot in the tutorial and instead of installing Debian, I installed Arch. (Using the above commands). Its working great with a 2GB SD card so I can use the USB port for an external HD.
LikeLike
Glad to know that things worked the way you want 🙂
LikeLike
I have a couple Pogoplug Mobiles that I’d like to try this mod. I opened one up and noticed that the solder spots are pretty small. Any tricks being able to solder the wires to the board?
LikeLike
Just be careful.. I soldered a fan header on those (had to bend the pins a little) on mine so I could remove the serial adapter easily. To do it, I pulled the pins out of the fan header with plyers and tinned the end with solder first. Then with a very fine point heat the header pin while holing it in place and the solder should stick. Once I did this on the three pins, I pushed the plastic of the header back down over (it will sill be about 1/8″ above the board) then and used hot glue to fill the gap and hold it all solid.
Good luck!
-Jeff
LikeLike
Wow. Nice work. I wondered if that was possible. I’ll probably end up just trying to solder the wires directly to the board. Thanks.
LikeLike
I just thought if I had to do this again, I would probably just use a clothes pin, drill 3 small holes spaced on the tip of one side and put pins through them. If done right, you could just clip it on to the solder points of the board then unclip it when done..
LikeLike
i have 2 old pogoplug v4 devices and wanted to do a DIY project to set them as NAS. I was able to activate the devices but was getting error when i try to register them. I purchased these devices 4 years ago. I cant enable ssh without registering the device. Please provide some suggestion on how can i proceed further.
LikeLike
I’d advise to first try contacting pogoolug support regarding registering the device.
LikeLike
It would be super helpful if the links/photos in this article could be restored!
LikeLike
Thanks Laurence for bringing it to my attention. Images have been restored.
LikeLike
forget the soldering!! Just hold the two ground and transmit pins on the usb-ttl device to the ground and receive pins on the pogoplug
get someone(unless you are an octopus) to type in “screen /dev/ttyUSB0 115200” on a linux box ,wait 20 seconds, then type “telnetd”
you won’t get a response since the receive pin is not connected
if the telnetd does get started then you can just telnet in*get the ip address from your router) and change the init script to start up telnetd when you reboot
now that you can get into the pogoplug with telnetd you can install debian,etc
LikeLike